You swapped speakers and it doesn’t sound as different as you hoped. Whether that’s the gear or the room is something you can pull apart by measuring the room. You don’t have to assemble a dedicated measurement rig: a phone and a speaker get you reasonably far into a room’s acoustics. The hard part isn’t the gear, it’s how you measure.
The short version
A smartphone covers two broad tracks. A real-time track that shows the sound right now (SPL, RTA), and a sweep-to-IR track that pulls out the room’s own response (RT60, frequency response, waterfall). If you actually want to know a room’s acoustics, it’s the latter, and the way in is recording a single sweep. Only absolute SPL needs a calibration mic; everything else is practical as a relative measurement on the built-in mic.
What measuring room acoustics means
Room acoustics is the “coloring” the room adds to sound on its way from the speaker, reflecting off walls, floor, and ceiling, to the listening position. Same speaker, different room, different sound. Measurement is the work of pinning that difference down with numbers instead of impressions.
There are mainly three axes to capture. Time (how long sound tails off), frequency (which bands are strong or weak), and the combination of the two (time × frequency). Those three map to RT60, frequency response, and waterfall respectively. The whole picture of room-acoustics measurement comes down to how you grab these three.
Start with SPL and RTA: the sound right now
The nearest tools at hand are SPL (sound pressure level) and RTA (real-time analyzer). SPL expresses loudness in dB, with A / C / Z (flat) weighting and Fast (125 ms) / Slow (1 s) / Impulse (35 ms) time weighting. RTA shows the spectrum of whatever’s playing in real time at 1/3 to 1/12 octave, with a choice of Hann / Hamming / Blackman windows.
But SPL and RTA only show “the sound playing right now.” How the room colors that sound — the response itself — they can’t tell you. That’s what the next step, sweep-to-IR, goes after. In Sonir, SPL / RTA / FFT are free. Get a read on level and tonal balance by hand first, then move to a sweep for the real measurement — that order makes sense.
Sweep-to-IR is the foundation
The way to pull out the room’s response whole is a sweep measurement. The flow: play a rising chirp (a sweep) from the speaker, record it, correct the play-to-record latency with a loopback, then convolve an inverse filter. That gives you the room’s impulse response (IR).
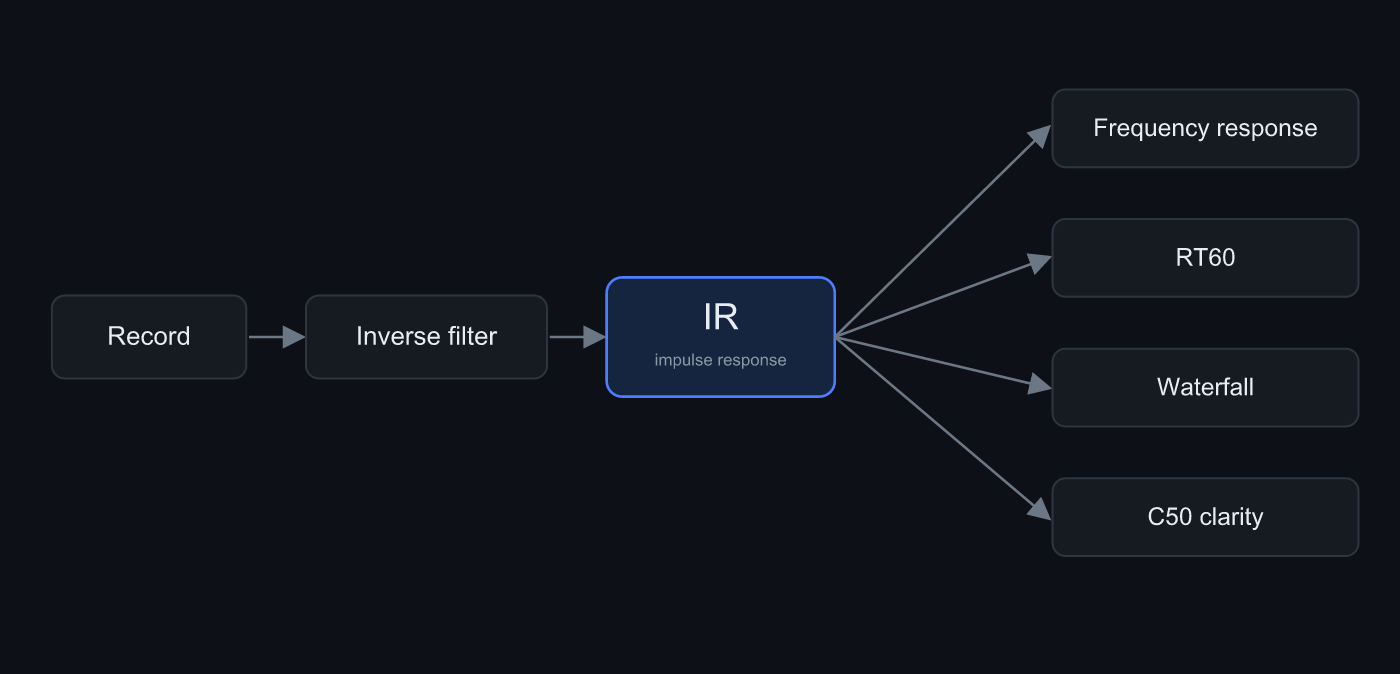 Record a sweep, convolve the inverse filter, and you get the IR. Frequency response, RT60, waterfall — all of them derive from the same IR
The IR is a single signal that holds everything about the room’s response, and the analyses that derive from it come out one after another. RT60, frequency response, waterfall — they all start from the same IR. So once you’ve recorded a sweep, the rest is just changing how you look at it. Putting sweep-to-IR wholesale into the MVP is Sonir’s differentiator, and the edge over competitors that push it to later shows up right here.
What comes out of the IR
Once you have a single IR, there’s a lot to read off it. Here are the main ones.
| Analysis | What it tells you |
|---|---|
| Frequency response | Strength per band. The room’s peaks and dips |
| RT60 (reverberation time) | Time to decay by 60 dB. The length of the tail |
| EDT | Slope of the early decay. Reverb closer to perception |
| C50 / D50 | Energy ratio of the first 50 ms to the rest. Clarity |
| Waterfall | Time × frequency × level. Bands that drag (ringing) |
| ETC | Energy-time curve. Arrival of reflections |
Broadband (the whole range as a single number) RT60, EDT, C50, waterfall, and frequency response are free in Sonir. Splitting further into ISO 3382 octave bands (63 / 125 / 250 / 500 / 1k / 2k / 4k / 8k Hz) or 1/3 octave to dig per band is Pro. It’s for when a full-band measurement turns up something like “only 5 to 8 kHz keeps ringing” and you want to zoom in on that band.
The measurement steps
The procedure itself is short.
- Pick the measurement position: Set the phone at the listening position, away from walls and desks. Aiming the mic toward the center of the room reduces bias from early reflections.
- Set the recording level: While playing the sweep, lower the volume until the recording peak sits between -6 and -12 dBFS.
- Play a full-band sweep and record it: Play a 20 Hz to 20 kHz sweep and record simultaneously. Longer at the right level beats short and loud.
- Read the metrics from the IR: Sonir builds an IR from the sweep and computes frequency response, RT60, and waterfall. Check that the decay curve falls in a straight line.
- Split by band: Look per octave band and check whether only the lows are dragging on.
One small thing. What does the most for SNR isn’t quieting the room, it’s lengthening the sweep. A long sweep is robust to noise through correlation processing and lifts your S/N without raising the volume. Measuring with a long sweep at midday is often more stable than waiting for late-night quiet.
Where a smartphone alone hits a wall
Honestly, a smartphone alone has lines it can’t cross.
The biggest is absolute SPL. Phone mics vary unit to unit, so an absolute value like “so many dB SPL” can’t come out without a calibration mic. The built-in mic’s frequency response also has its own quirks per model. Loading a calibration file (.txt) corrects this, but if you want to nail frequency response, calibration is effectively a prerequisite.
Conversely, measurements that don’t need an absolute value fit smartphones well. RT60 is a time-domain index, so the slope comes through even if mic sensitivity is off, and frequency response is plenty usable as a relative comparison on the same device. Lean into “measure under the same conditions and compare” and the phone’s weaknesses barely bite.
One more that’s easy to forget: a measurement also carries the character of the speaker and playback chain. If you want to see only the room, keep the playback chain fixed across measurements — that’s the rule. And underlying all of it: if the recording clips, whatever you measure is broken. Recording peak at -6 to -12 dBFS — that’s the one thing you don’t miss.
Summary
- Room acoustics has three axes: time, frequency, and their combination. RT60, frequency response, and waterfall map to them.
- SPL / RTA show the sound right now; sweep-to-IR shows the room’s own response. Measure seriously and it’s the latter.
- Once you’ve captured a single IR, RT60, frequency response, waterfall, and C50 all come out in a chain.
- Absolute SPL needs a calibration mic. Everything else is practical as a relative measurement on the built-in mic.
- Recording peak at -6 to -12 dBFS, and earn SNR from sweep length. Miss this and everything falls apart.
FAQ
Can I measure room acoustics with just a smartphone?
For relative measurement, yes, practically. Record one sweep and you get an IR, and from it RT60, frequency response, and waterfall. Only absolute SPL needs a calibration mic.
How is this different from an SPL meter app?
An SPL meter only shows how loud the sound is right now; it can’t measure how the room colors that sound. Sweep-to-IR goes after that response itself. In Sonir the latter’s basic measurement is free.
Do I need a calibration mic?
If you want absolute-accurate frequency response, yes. For RT60 or relative comparison on the same device, the built-in mic is plenty. Loading a calibration file (.txt) also corrects the built-in mic’s response to a degree.
What recording level should I aim for?
A recording peak of -6 to -12 dBFS. Clipping is the single biggest cause of broken measurements. When you want S/N, earn it from sweep length, not volume.
Which analysis should I look at first?
Frequency response and RT60. Most room complaints come from the lows acting up — peaks and reverb — so checking how the low end behaves first gets you there fastest.
Related articles
- How to measure RT60 with a smartphone: A deep dive on reverberation time alone, down to how clipping breaks the value
- Listening room simulator: Before you measure, estimate where the low-frequency modes land from the room dimensions
- Feature details: From SPL / RTA through sweep → IR to RT60, waterfall, and frequency response
Measure it in Sonir
Sonir is an app that completes acoustic measurement and comparison on your smartphone. The room-acoustics measurement in this guide too — just play the sweep and record, and it derives frequency response, RT60, and waterfall from the IR automatically. Basic measurement is free; per-band deep dives are Pro.
iOS / Android, coming soon. See the features page.