
“Same speaker, but it sounds different every time I record it.” Record enough of your own system and you hit this wall. The cause is usually not the gear, it’s that the recording conditions weren’t held still. The volume drifted a little, you stood 10 cm to the side, the AC was left on. That alone is enough for a “difference” to appear out of nowhere.
The short version
A recording comparison is mostly decided before you press record, the moment you lock the conditions. Fix the volume (level), distance, room, and mic position; keep the input gain put and turn AGC off. Read the take itself through the recording score and the reference-based frequency response, and settle the objective difference between speakers or rooms with the difference curve of two overlaid measurements. Sonir folds that whole loop, record, log, compare, into one flow on your phone.
Why a recording sounds different every time
Air recording means capturing the sound a speaker puts into the room, air and all, with a microphone. Unlike tapping the headphone output, the room, the mic, and where you stand all ride along in the result. That isn’t a weakness, it’s the point: you get something close to what your ears actually hear. The price is that any drift in the conditions lands straight on the sound.
The drift comes from roughly four places: volume, distance, the room (including the noise floor at that hour), and the mic. Volume is the nastiest of them. People hear a slightly louder signal as the “better” one, so a fraction of a dB quietly turns into “the gear got better.” A large share of the cable and DAC “night and day” reports are born right here.
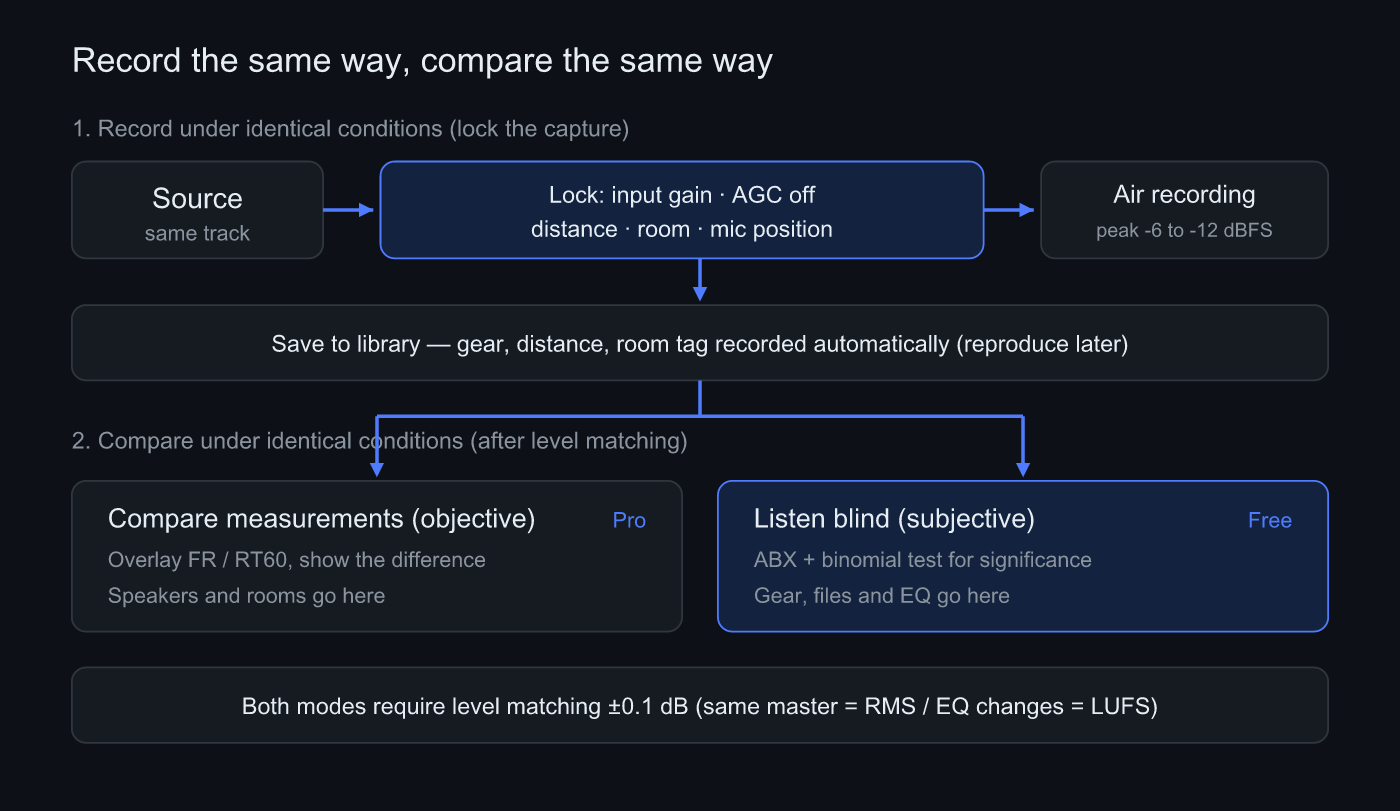 Record a source under locked conditions, store it in the library with those conditions, then compare through the recording score and a measurement overlay
Recording the same way: four things to lock
The discipline is simple. You’re really just locking each condition in a form you can reproduce next time.
Volume first. Set the speaker level and don’t touch it again. On the capture side, aim for a peak that lands at -6 to -12 dBFS. Overshoot and clip, and the waveform tops flatten so the downstream comparison and measurement both fall apart. Undershoot and the take sinks into the noise floor, which is no comparison either.
Input gain and AGC get killed together. Left alone, a phone mic runs automatic gain (AGC) that lifts quiet passages on its own. Once that’s in, the gain scatters from take to take and the comparison never lands. Sonir holds the input gain fixed during a take and turns AGC off reliably per device. The classic “it saturates the moment a quiet track plays” trouble doesn’t go away until that’s dealt with.
Distance and mic position. Pin the distance from the speaker and the mic’s height and angle, measure them with a tape, and write them down. “Roughly the same spot” isn’t enough; 10 cm or 15 degrees shows up clearly in the highs and the imaging.
The room, last. Windows, curtains, where the furniture sits, and the hour you record. The noise floor can sit 10 dB higher at noon than at midnight. If you want a like-for-like comparison, the easy move is to record the gear you’re comparing back to back, in one sitting.
Carrying the conditions forward
Even with all that locked, memory is not to be trusted. Nobody recalls “what was the distance again” half a year later. So Sonir writes down the gear, distance, and room tag alongside each recording automatically. When you record the next contender, you recall the previous conditions and reproduce them. Taking the job of matching conditions off your memory is the dull part that quietly does the most for reproducibility.
Comparing the same way: what are you comparing?
Once you have the takes, there’s one fork to take before comparing. “How do they differ physically” and “how does the voicing differ” are different questions, and mixing them breaks the conclusion. Sonir’s compare tab splits those two up front.
| What you’re comparing | Right mode | What you get |
|---|---|---|
| Speakers, rooms, upstream gear | Compare measurements (objective) | ”△ dB apart at ○ Hz” |
| The voicing of a piece of gear | Compare tonality (preference, free) | “A is brighter / has more sheen” |
| How good the take itself is | Recording score | clipping, noise floor, dynamic range |
The transducer itself, the speaker or the headphone, can’t be ranked by ear. Push it through a single mic and the imaging and soundstage drop out, leaving only a coarse tonal difference. The honest move is to overlay measurements. Upstream gear like an amp, a DAC, or a cable is no different: if the gap only amounts to something that sinks into the noise and distortion floor of an air recording, chasing it by ear pays badly.
So Sonir ships no feature that ranks things by ear. There was a blind ABX mode; it was built and then removed in June 2026. Playing an air recording back through headphones to identify gear sits too far from what you actually want to know, which is how it feels to you in that room. When the urge to rank by ear shows up, it gets routed into measurement. That is the current position.
If you still want to listen for yourself, level matching is the one thing you cannot skip: get the two within ±0.1 dB. The same master matches closely on RMS, but a comparison that changes the spectrum, such as EQ on versus off, shifts the perceived loudness and has to be matched on LUFS instead. Skip this and the whole discussion quietly collapses into an argument about volume. This is not an app feature; it is the etiquette of any by-ear comparison.
What’s baked into two separate takes
Honestly, this is the hardest part of comparing air recordings. When you put a take made with gear A against a take made with gear B, the gear difference isn’t the only thing in there. Record at different moments and the noise floor differs; stand a little off and the room reflections change; two separate takes carry a timing offset between them too. Cleanly separating “the gear difference” from “the recording-condition difference” is, in truth, hard.
So what a comparison of two separate takes really tells you is, strictly, “did re-recording with different gear produce a difference.” That’s still worth plenty. How tightly you locked the conditions decides how much of the result leans on the gear, which is why the four locks above feed straight into this. Just keep the premise in mind: a confound you can’t fully erase stays behind. The unit-to-unit variation of the built-in mic plays in here too, and that part isn’t fully nailed down yet.
Recording and comparing on your phone
The procedure itself is short.
- Log the gear and room before recording: capture the gear, distance, and room tag first, as the recall key for the next take.
- Fix the input gain and turn AGC off: don’t move the gain mid-take; kill AGC so it can’t lift quiet passages.
- Record at a peak of -6 to -12 dBFS: lock the speaker volume and record without clipping.
- Record the other take the same way: match distance, mic position, and time of day for take two.
- Read the score, then overlay measurements: read the take through the recording score and the reference-based frequency response, and put speakers or rooms into the compare tab as two overlaid measurements.
Common mistakes
Forgetting to match level, then concluding “the gear got better.” This one dominates. The volume while recording and the level while comparing both have to be matched, or it means nothing. A comparison that never logs the conditions it was recorded under can’t be trusted later, which is why Sonir writes down the gear, distance, and room with every take.
Trying to rank speakers by ear. No amount of listening fixes a take that already lost its imaging and soundstage to a single mic. What comes out is a coarse tonal difference. Speakers and rooms belong in the measurement overlay.
Recording each side on a different day without minding the hour. The noise floor shifts and only the impression of the quiet passages changes. If you’re comparing, record them together.
By the way, once you tighten the conditions like this, a lot of the changes you were sure were “night and day” stop showing up as a difference the instant you match them. It’s not a pleasant experience, but being able to check that calmly is part of what makes air recording interesting.
In short
- A recording comparison is mostly decided by locking conditions before you record: volume, distance, room, mic position
- Record at a peak of -6 to -12 dBFS; fix the input gain and turn AGC off
- Read the take itself through the recording score and the reference-based frequency response
- The objective difference between speakers, rooms, and upstream gear is read from the difference curve of two overlaid measurements; nothing here ranks by ear
- Two separate takes carry a recording-condition difference; the tighter you lock, the more the result leans on the gear
FAQ
What is air recording?
It is recording the sound a speaker puts into the room with a microphone, rather than tapping the headphone output directly. The room, the mic, and your listening position all ride along in the result. You capture something close to what you actually hear, but any drift in the conditions becomes drift in the sound.
What matters most when comparing recordings?
Matching the level. People hear a slightly louder signal as the better one, so a fraction of a dB masquerades as a gear difference. Match the two within ±0.1 dB: RMS for the same master, and LUFS when the spectrum changes, such as EQ on versus off.
What recording level should I aim for?
A peak of -6 to -12 dBFS. Clip it and the waveform tops flatten, breaking both comparison and measurement; go too low and the take sinks into the noise floor. Lock the input gain and leave it alone during the take.
Can I rank speakers by ear from air recordings?
No. A single mic strips imaging and soundstage from a speaker and leaves only a coarse tonal difference. Compare speakers and rooms with a measurement overlay (objective), and use the tonal map when you want to line gear up by voicing. Upstream gear like amps and DACs is the same story: a difference that sinks into the noise and distortion floor of an air recording is better settled by measurement than by ear.
Related
- How to compare speakers A/B fairly: matching the conditions and settling it on the difference curve
- Measure Room Acoustics with a Smartphone: speakers and rooms are compared by measurement, not by ear
- Measure RT60 with a Smartphone: the same measurement honesty, starting from reverberation time
Record and compare with Sonir
Sonir is an app that completes air recording, acoustic measurement, and comparison on your phone. The same-condition recording and comparison in this article runs end to end inside it: fixed input gain and AGC off, automatic logging of conditions, and everything from the recording score to a measurement overlay. The recording score, the tonal comparison, and overlaying measurements against each other are all free.
Download on the App Store. Android coming soon. See the features page.